GC Configuration
Network Conditions
The Agilent 7890 GC communicates via a standard LAN (RJ45) connection using the TCP / IP protocol.
The PC and the GC can be connected via either
- The available laboratory network
Or
- An isolated network isolated from the internet.
Note: it is not possible to connect to the GC to the PC directly. You must always use either the laboratory network or the switch provided.
GC on the Lab Network (Domain)
Connections to the Lab Network
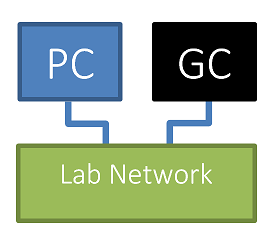
Figure 5-31: PC and GC connected to the same laboratory network
OR
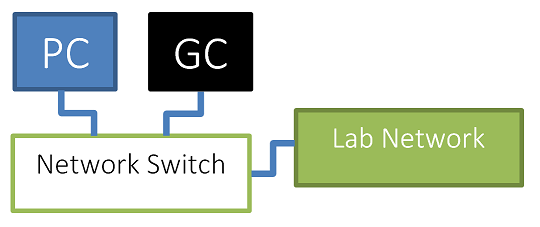
Figure 5-32: PC and GC connected to the same network switch and the network switch connected to the laboratory network
If there are two laboratory network sockets available, the PC and GC can both be connected to the network and they will be able to communicate without the switch.
If there is only one laboratory network socket available, then you can connect the provided network switch to the available network socket and then plug the PC and the GC into the network switch.
Configuring the GC to connect to the Lab Network (Domain)
To configure the GC to receive an IP address from the network DHCP server (required):
On the GC Panel
- Press [Options]. Scroll to Communications and press [Enter].
- Scroll to “Enable DHCP” and if the setting displays as [Off], press [On / Yes] button to change the setting to [On].
-
If changing the setting, you will be prompted to turn the GC off and then on again. To turn the GC Off and On again (via the control panel):
- Within the Communications menu, scroll to Reboot GC
- Press [On / Yes]
- Press [On / Yes] to confirm reboot
- Once the GC has restarted, press [Options]. Scroll to Communications and press [Enter].
- Scroll to IP and note the IP address displayed, for entry into the IonOS software.
Configuring the PC to connect to the Lab Network (Domain)
Note: A PC is normally configured to support DHCP as standard – meaning that it will automatically be allocated an IP address by the network (domain). Contact your network administrator to confirm the required settings for your network.
Should you PC not be configured for DHCP, you can enable DHCP by following these steps:
- Select Control Panel -> Network Connections.
- Select the network connection that is being used (if there is only a single connection available, it is usually called “Local Area Connection”).
If more than one network connection is displayed, then you should verify which network connection has visibility of the GC.
- Right click and select Properties.
- From the list in the General tab, select “Internet Protocol (TCP / IP)”, and click Properties.
- Ensure that the “Obtain an IP address automatically” option is selected.
- Ensure that the “Obtain DNS server address automatically” option is selected.
- Click OK, then Close, to close the dialogs.
GC on an Isolated Network
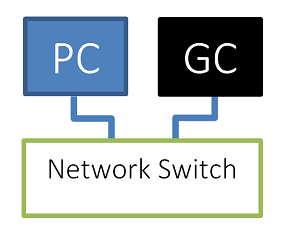
Figure 5-33: PC and GC connected to the same network switch and the network switch isolated from the laboratory network
OR
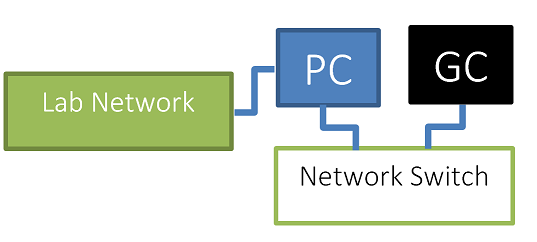
Figure 5-34: PC and GC connected to the same network switch and the network switch isolated from the laboratory network. The PC is also connected directly to the laboratory network. I.e. the PC has two network interfaces.
In this scenario, there will be no DCHP server available (normally part of a laboratory network) to allocate an IP Address to the GC. Therefore:
- The GC will need to be configured to use a fixed IP Address.
- The network adapter that the PC is connected to the GC via, will also need to be configured to use a fixed IP Address.
It is still possible to have the PC connected to a network separate to the GC (laboratory network / Domain). In this situation, another network adapter will probably need to be used (e.g. USB Ethernet Adapter), as PC’s do not typically come with support for multiple networks.
Configuring the GC to have a fixed IP Address
On the GC Panel
- Press [Options]. Scroll to Communications and press [Enter].
- Scroll to “Enable DHCP” and if the setting displays as [On], press [On / Yes] button to change the setting to [Off].
-
If changing the setting, you will be prompted to turn the GC off and then on again. To turn the GC Off and On again (via the control panel):
- Within the Communications menu, scroll to Reboot GC
- Press [On / Yes]
- Press [On / Yes] to confirm reboot
- Once the GC has restarted, press [Options]. Scroll to Communications and press [Enter].
- Scroll to IP. Enter the following IP address 192.168.100.2, separated by dots, and press [Enter].
- A message tells you to power cycle the instrument. Do not power cycle yet.
- Press [Clear].
- Scroll to GW. Enter the following IP address 192.168.100.1 and press [Enter]. This is the IP address that will be allocated to the PC.
- A message tells you to power cycle the instrument. Do not power cycle yet.
- Press [Clear].
- Scroll to SM and press [Mode / Type]. Scroll to the appropriate subnet mask 255.255.255.0 from the list given and press [Enter].
- A message tells you to power cycle the instrument.
-
Press [Clear].
- Within the Communications menu, scroll to Reboot GC
- Press [On / Yes]
- Press [On / Yes] to confirm reboot
Configuring the PC to have a fixed IP Address
- Select Control Panel -> Network Connections.
- Select the network connection that is being used (if there is only a single connection available, it is usually called “Local Area Connection”).
If more than one network connection is displayed, then you should verify which network connection has visibility of the laboratory network.
- Right click and select Properties.
- From the list in the General tab, select “Internet Protocol (TCP / IP)”, and click Properties.
- Make a note of the current settings in the General tab of this dialog, in case they need to be restored later. Otherwise you may need to contact your network administrator for this information, should you decide to connect the GC to the laboratory network.
-
Ensure that the “Use the following IP Address” option is selected and the following settings are input:
- IP address = 192.168.100.1
-
Subnet mask = 255.255.255.0
-
Default gateway = 192.168.100.1
- Delete any entries for Preferred and Alternate DNS servers.
- Click OK, then Close, to close the dialogs.
Configure IonOS to communicate to the GC
- Start IonOS
- On the IonOS Home page, click Systems -> Configure.
- Select the system that you want to configure
- Select the GC device that you want to configure and click the Edit button.
- Ensure that the IP Address setting is valid.